Product added to cart
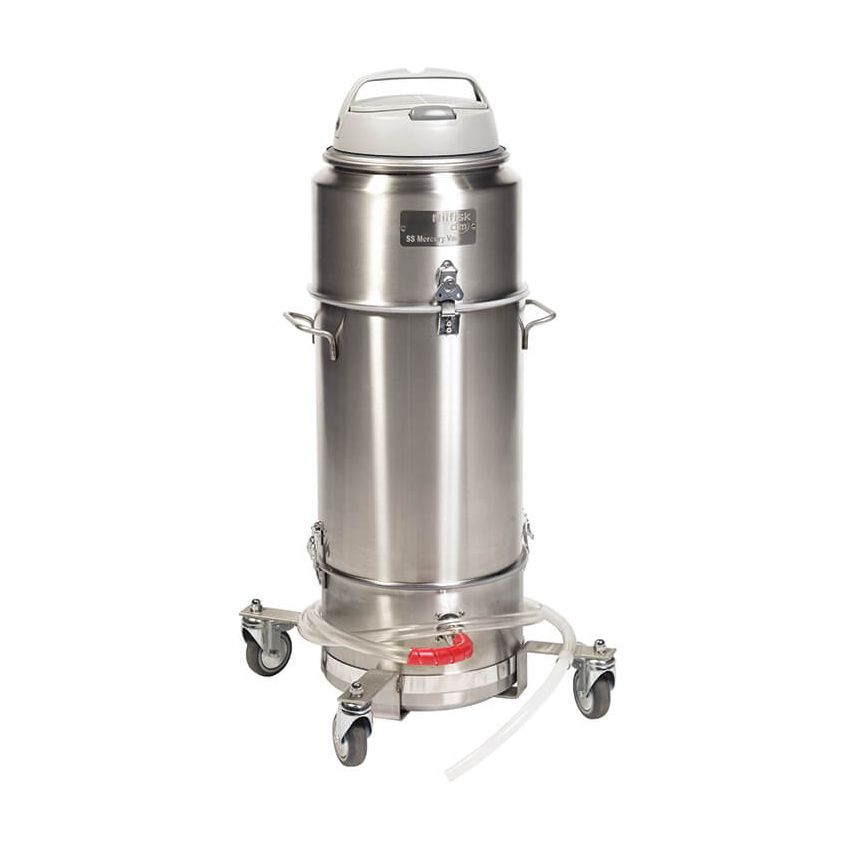
Nilfisk SS Mercury Vacuum M90049
$6,850.00
In stock
SKU
VN9000
The Nilfisk SS Mercury Vacuum recovers liquid mercury spills and granular mercury compounds effectively while absorbing mercury vapors.
The Nilfisk SS Mercury recovers liquid mercury spills and granular mercury compounds effectively while absorbing mercury vapors. Mercury vacuum by Nilfisk is stainless steel which recovers liquid mercury spills and granular mercury compounds effectively, while adsorbing mercury vapors in the process. The 31lb. special carbon charge, in a handy cartridge, typically has a 5-year service life before requiring replacement.
Features
- Positive twist safety latches offer added security
- Rear castor supplied with brake to prevent machine movement while stationary on slope
- Impregnated carbon granules in patented honeycomb layers provide the most complete contact, and longest dwell time between carbon and mercury vapors.
- Stainless Steel container and trolley ensure easy decontamination
- Pre-HEPA prevents harmful particulate from damaging carbon filter
- Activated carbon adsorbent filter prevents mercury from escaping via the vacuums exhaust
- Smooth lined, transparent Tygon® hose reduces mercury droplet residue
- 1 ½ quart reusable collection bag collects mercury for reuse or reprocessing
- Heavy-duty trolley and locking wheels provide stability and safety
- Optional exhaust filter
Specifications
- Weight: 28.5 kg / 63 lbs.
- Product Type: Stainless Steel Mercury Vacuum Cleaner
- Airflow Rate: 24 cfm
- Height: 89 cm (35 inches)
- Wattage: 1100 W
- Width: 55.88 cm (22 inches)
- Length: 55.88 cm (22 inches)
- Material: Stainless Steel
- Noise Level: 61 dB(A)
- Amperage: 10.5 A
| Brand | Nilfisk |
|---|---|
| Dimensions | 22" x 22" x 35" |
| Width | 22in |
| Length | 22 inches |
| Air Filtration Tool Type | Mercury Vacuum |
| Watts | 1100 Watts |
| CFM | 24 cfm |
| Current | 10.5 Amp |
| Noise Level | 61 dB |
| Material | Stainless Steel |
Assembly and Use:
- Remove the upper two-thirds of the cleaner by releasing the clips attaching the adsorbent filter cartridge to the lower container. Lift off this upper part, taking care when setting it down again that the HEPA pre-filter is not damaged or displaced.
- Liquid Mercury Collection: Open a GORE-TEX® droplet collection bag (P/N 01722501) and slide the metal retaining clamp (P/N 01703601) around the collar of the bag. Slide the opening, seam side down, over the container’s inlet tube. To secure the bag, tighten the metal retaining clamp around the inlet tube by pulling the ends together and tightening the clamp. Mercury Dust and Other Dry Applications: Using a Nilfisk paper bag (P/N 81620000), carefully expand the paper bag and place it in the lower container. With both hands, pull the bag’s collar over the suction inlet . The Gore-Tex bag can also be used for small dry applications.
- Replace the top two-thirds of the machine on the container bottom and secure clips. Be sure that all silicone rubber seals are seated properly to ensure that the seals are tight.
- Fixed Power Cord: The power cord on the SS Mercury Vacuum is secured to the rear of the motorhead by a small plastic bracket. To remove or replace the power cord, simply remove the 2 screws holding the plastic bracket.
- Installing the optional HEPA or ULPA* Exhaust Filter: If this cleaner is to be used for the recovery of hazardous or toxic dust in a controlled environment a HEPA or ULPA exhaust filter must be installed. On either side of the motor are two large screws. Turn them 90 degrees either way to a vertical position and push down on the center of the motor handle. This will disengage the motor handle and motor diffuser. Replace them with the exhaust filter and its longer exhaust filter handle, then turn the screws 90 degrees back to their original horizontal position. The exhaust filter is now properly mounted.
- Attaching the Accessories: For liquid mercury spills, install the clear Tygon hose (P/N 01796591). This hose features a tapered reinforced tip; no additional nozzles are needed. Two red plastic caps are provided with the machine. Use one cap to seal the end of the hose when not in use. The other cap should be used to seal the machine inlet if the tygon hose is removed. Sealing the hose and container will prevent Mercury leaks and will prolong the life of the activated carbon filter. For added security, the canister is equipped with positive twist safety latches. For dust applications, a variety of optional 1-¼” diameter hoses, wands and nozzles are available.
- To start and stop the motor, depress the gray switch on the front of the motor.
Emptying
- The Tygon hose that is supplied with the Nilfisk SS Mercury Vacuum Cleaner has a smooth lining. This smooth lining not withstanding, tiny mercury droplets may occasionally remain in the hose after the spill has been picked up. It is therefore of extreme importance that THE HOSE END BE RAISED UP TO A VERTICAL POSITION AND SHAKEN BEFORE THE MOTOR IS SWITCHED OFF. The hose should then be sealed with the hose cap provided (P/N 01799015).
- Remove the upper two-thirds of the cleaner by releasing the container clamps attaching the adsorbent filter cartridge to the lower container. Lift off this upper part, taking care when setting it down that the HEPA pre-filter is not damaged or displaced.
- Liquid Mercury Collection: To remove the Gore-Tex collection bag, loosen the bag clamp. Carefully pull bag away from inlet tube, taking care to keep the bag in a VERTICAL POSITION so as not to spill any of its contents. Liquid mercury can then be poured from the bag into another
container for reuse or disposal, and the bag can be saved for future use. Mercury Dust and Dry Applications: Remove the paper bag by simply pulling the bag opening free of the inlet tube, taking care not to squeeze or compress it. Dispose of the paper bag in a sealable plastic bag. Install a new paper bag according to “Assembly and Use”, Step 2. - Disposal: Depending on local regulations and the composition of the material you have collected, there will be a requirement for special handling and labeling of the filled and sealed plastic bags. Consult your local Occupational Safety and Health Agency (OSHA) and Environmental Protection Agency (EPA) officials for details.
Filter Replacement
To ensure that your Nilfisk vacuum cleaner delivers the years of trouble-free operation for which it was designed, it is necessary to check and replace filters regularly.
- Gore-Tex Collection Bag: After it is emptied, this bag can be replaced in the machine to be used repeatedly for collecting liquid mercury.
- Disposable Paper Bag: This should be replaced when approximately one-third (1/3) full and then disposed of only in a sealed plastic bag. Do not attempt to reuse the disposable paper bag. Specify Nilfisk part number 81620000 when reordering.
- Internal HEPA Filter: The glass fiber element in the internal HEPA filter (P/N 12015500) should perform satisfactorily for a minimum of one year. It cannot be renewed or restored. Exact life of the filter will depend upon the frequency of use and amount and type of material collected. NOTE: The HEPA filter must be replaced more frequently if the cleaner has had unusually heavy use or if the vacuum cleaner has been operated without a paper bag installed. Remove the top one-third of the container and set it aside. Remove the next section, turn it over and you will see a plastic HEPA filter cover. With a screwdriver, unscrew the four screws from the HEPA cover. Remove the HEPA cover and set aside. Next, loosen and remove the four screws from the two metal clamps securing the HEPA filter. Remove both metal clamps and carefully remove the filter. Discard the filter in a sealable bag. To install the new filter, insert the HEPA cartridge in the square cavity with the gasket side down. Replace the two metal clamps and secure them with the four screws. NOTE: Make sure the screws are well tightened to provide the necessary seal. Replace the plastic HEPA filter cover and secure with the four screws. Reassemble container.
- Mercury Vapor Adsorbent Cartridge: There are no visual means of determining when this cartridge needs to be replaced (P/N 01796549).
- Microfilter: This small white felt sock, which fits over the motor bottom, will require periodic inspection. Dark colored dust will discolor this white microfilter. Change the microfilter as soon as discoloration is easily noticeable. Frequency of replacement will depend on the amount of use the cleaner gets. Do not shake the microfilter since this can cause liberation of potentially harmful microscopic dust into the air. Remove carefully and discard with collected debris in the sealable poly bag. Specify Nilfisk part number 11730410 when reordering the microfilter.
- Optional HEPA or ULPA Exhaust Filter: If the microfilter is properly maintained, the glass fiber element in the exhaust filter should perform satisfactorily for at least one year. It cannot be renewed or restored by shaking. Locate the large gray screws on either side of the motor top. Turn them 90 degrees either way to a vertical position and push down on the exhaust filter handle. Once the exhaust filter is disengaged, remove the protective aluminum casing by removing the four Phillips head screws in the housing. Replace the cartridge (HEPA filter P/N 01727631, ULPA filter P/N 01737631) and reassemble. Cartridges should be replaced if the vacuum cleaner has noticeably stronger suction without them.
Write Your Own Review
We found other products you might like!


