Product added to cart
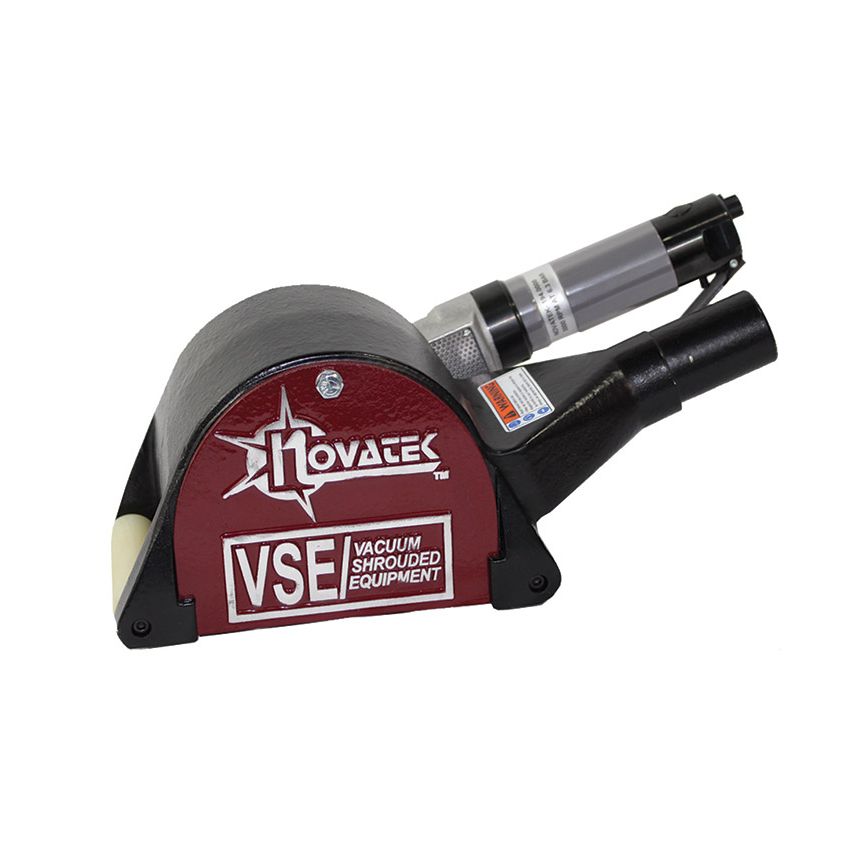
Novatek Compressed Air Rotopeen, Shrouded - 2 in w/ Cutter
$1,569.75
In stock
SKU
TT0012A-2S
VSE Peening Preparation Tools are versatile, high production tools ideal for the removal of coatings from both steel and concrete substrates.
VSE Peening Preparation Tools are versatile, high production tools ideal for the removal of coatings from both steel and concrete substrates.
A quick change hub with an assortment of abrasives enables you to rapidly remove everything from mastics and alkyds to epoxy coatings while containing hazardous dust.
The PPT, with star or beam cutters, will remove coatings from many types of piping and curved surfaces. If you need a tool that will do everything from profiling steel to removing hazardous coatings, the PPT is the tool that gets the job done!
VSE Peening Preparation Tools utilize 3M™ brand Heavy Duty Tungsten Carbide tipped Rotopeen™ flaps. In accordance with SSPC surface preparation specifications it may be necessary to utilize more than one type of cleaning device to achieve SP-11.
Features and Benefits
- Lightweight Tools
- Can be used vertically and overhead
- Available with Varying Cutting Media
- Imitates a shot blast finish
- Converts in one minute to accept other surface preparation media
- Optimized Power Source Maintains Speed Under Load
- Maximizes coatings removal
- Optional Accessories
- Star cutters for tackling more demanding applications such as non-skid, PRC and coal tar removal
- Available with compressed air or electric drive motors, 2” or 4” cutting widths
- US Patented Vacuum Shroud
- Engineered specifically for lead based paint removal
- Maximizes debris capture and virtually eliminates detectable dust emissions
- Complies with OSHA and EPA standards easily when matched with TVS® HEPA vacuums
- Vacuum ports as standard for dust free working
Specifications
- Model : 2" w/ Cutters
- Part No. : 194.C205
- Working Width : 1.97" (50mm)
- Weight : 11.5lbs(5.2kg)
- Length : 14" (356mm)
- Width : 6.25"(152mm)
- Height : 6" (152mm)
- R.P.M. : 2700
- Air Con. : 30cfm (840lpm)
- Air Press. : 90psi
- Power : 1.2Hp
| Brand | Novatek |
|---|---|
| Hand Tool Type | Air Rotopeen |
| RPM | 2700 |
| Air Consumption | 30 cfm |
| Air Pressure | 90psi |
| Power | 1.2 Hp |
| Length | 14in |
| Width | 6.25in |
| Working Width | 1.97 Inch |
| Features | With Cutter |
Placing Tool in Service
- Always install, operate, inspect and maintain this product in accordance with all applicable standards and regulations (local, state, country, federal, etc.).
- Compressed air models always use clean, dry air at 90 psi (6.2bar/620kPa) maximum air pressure at the inlet. Higher pressure may result in hazardous situations including excessive speed, rupture, or incorrect output torque or force.
- Electric models must always utilize proper gauge, and rated electrical cords with correct connections.
- Be sure all hoses and fittings are the correctly sized and secured.
- Ensure an accessible emergency shut off has been installed in the air or electrical supply line. Make others aware of its location.
- Do not use damaged, frayed, or deteriorated air hoses and fittings.
- Always use proper gauge electrical cords with correct connections. (When applicable.)
- Electric models must not use damaged, frayed, or deteriorated electrical cords and connections.
- Keep clear of whipping air hoses. Shut off the compressed air before approaching a whipping hose.
- Always turn off and disconnect the tool from its power supply before installing, removing or adjusting any accessory, or before performing
any maintenance on the tool. - Do not lubricate tools with flammable or volatile liquids such as kerosene, diesel or jet fuel. Use only recommended lubricants.
- Keep work area clean, uncluttered, ventilated and illuminated.
- Keep all electrical connections clear of water or other liquids. (When applicable.)
- Do not operate the machine while flammable or volatile liquids such as gasoline, diesel or jet fuel are present. Failure to do so can result in
explosion. (When applicable.) - Do not remove any labels. Replace any damaged label.
Using The Tool
- Always wear protection when operating or performing maintenance on this tool.
- Always wear hearing protection when operating this tool.
- Always use Personal Protective Equipment appropriate to the tool used and material worked. This may include dust mask or other breathing apparatus, safety glasses, ear plugs, gloves, apron, safety shoes, hard hat and other equipment,
- Prevent exposure and breathing of harmful dust
and particles created by power tool use: - Some dust created by power sanding, sawing, and grinding, drilling, and other construction activities contains chemicals known to cause cancer, birth defects or other reproductive harm. Some examples of these chemicals are:
- - Lead from lead based paints, Crystalline silica from bricks and cement and other masonry products, and Arsenic and chromium from chemically treated lumber. Your risk from these exposures varies, depending on how often you do this type of work. To reduce your exposure to these chemicals: work in a well ventilated area, and work with approved safety equipment, such as those dust masks that are specially designed to filter out microscopic particles.
- Keep others a safe distance from your work area, or ensure they use appropriate Personal Protective Equipment.
- This tool is not designed for working in explosive environments, including those caused by fumes and dust, or near flammable materials.
Read all instructions and data in operation and maintenance manual prior to operation of this equipment.
These instructions are for your protection and convenience. Please read them carefully since failure to follow the precautions could result in injury. Whenever using electric powered equipment, basic safety precautions should be followed.
Prior to use
Inspect the tool’s external parts, fitting and hub assembly for loose or damaged parts prior to use.
CAUTION: Do not inspect the tool hub assembly without first disconnecting the tool’s power supply.
Air Powered Unit
- Insure that sufficient length of 3/8” diameter hose, supplied with a minimum of 30 SCFM compressed air at 90 PSI is available
with fittings compatible to the tool’s 3/8” MQC air inlet plug. A supply of clean, dry air is required and suitable filter lubrication is
recommended for trouble free use.
WARNING: Air inlet plugs less than 3/8” will not supply sufficient airflow to the RPT and will cause RotoPeen Flap failure.
- Tighten all hose connector fittings and blow out hose to insure that all debris is purged from the supply line.
- Put a few drops of light machine oil into the air inlet of the tool on a daily basis prior to start up and at shut down.
- Remove screw (#24) and add a few drops of gear lube into the gear head.
WARNING: Failure to lubricate the gear head may result in unsatisfactory performance, premature failure and may void the warranty.
- The air motor drive unit requires the correct air input fitting be installed (part # H0255) to insure that 3/8” plug size is used.
Electric Powered Unit
Insure that electric power (120v-10amp) is available, per the name plate. Power cords should be limited to 50’ in length and have a minimum #14 gage wire heavy duty.
In Use
To start the Rotopeen Prep Tool operation, place the RPT flat on the surface to be cleaned. Make sure to keep the roller guides in contact with the work surface. NEVER operate the tool while not in contact with the work surface if there is a possibility of bodily contact with the rotating hub.
To start the cleaning process, depress the throttle lever slowly and guide the RPT smoothly over the work surface. Keep the roller guides in contact with the work surface at all times.
WARNING: Do not run the RPT over edges of the work surface. This may tear Roto Peen Flaps and create a dangerous operating condition. The resulting damage to the tool may not be covered under warranty.
Always use correct abrasive flaps. Experimentation with various flaps or cutter assemblies will be beneficial in terms of production. For example, it is recommended that a star cutter assembly be used initially on coatings thicker than 10mm. A change in Roto Peen flaps will tend to achieve the desired profile.
The electric drive motor switch should be in the “off” position when not in use. After proper power has been supplied to switch be turned to the “on” position. The motor is set for the proper no-load speed (2000 rpm) for most efficient operation under load conditions. No attempt should be made to vary this speed from the optimum rpm setting.
Write Your Own Review


